
iPad Usage Steps
Stage 1: Beginning Setup
Click here to go to the Beginning Setup Page (4 steps).
Stage 3: Reviewing Plays
Click here to go to the Reviewing Plays Page (2 steps).
Stage 4: Exporting Plays
Click here to go to the Exporting Plays Page (3 steps).
Stage 2: Recording Options
Step 1: Create an Event
When on the events page, you will see there are 3 categories at the top: Game, Practice, and Trade. These are used to help organize the types of events that you create in the SkyCoach app.
To create an event, press the plus button in the top-right corner of the event list, add the name and date of the event, then select "Done." Once finished, select the name of that event to join it.

NOTE: Make sure that the iPad that you are creating the event on is connected to the SkyCoach network before creating the event (see Stage 1, Step 4), so that the event immediately updates to all other devices on the SkyCoach network.
Step 2: Choose a Recording Method
NOTE: Before continuing, there are 3 iPad rules that you must follow to make sure that your iPads run smoothly and quickly throughout the game:
- Only join 1 SkyCoach Wi-Fi at a time.
- Join the event before kickoff. Make sure that all iPads that are being used with SkyCoach are joined in the event in the SkyCoach app before the game begins.
- Keep the iPad screen active.
Once in your event, select the camera icon in the bottom-right corner.

You will then be prompted to choose a recording type. Choose your type and continue.
There are two main ways to record plays on the iPad:
- Option 1: Use Local Camera will use your iPad's camera as an angle with a red button to start and stop recording.
- Option 2: Remote Control Only will show a view of all your current angles, as well as a button to stop and start recording, and optional metrics that you can tag your plays with.
For both options,
- There are optional metrics available for you to use for tagging plays.
-
When pressing record, ALL other RCKs and iPads connected will start recording simultaneously.
- You can start and stop recording from any one device (e.g., if you have an RCK and an iPad using Local Camera, you can start/stop recording from either the RCK or the iPad).
-
Connected cameras WILL NOT start recording. You must hit record on those connected cameras in order to start recording on their SD cards.
Use Local Camera
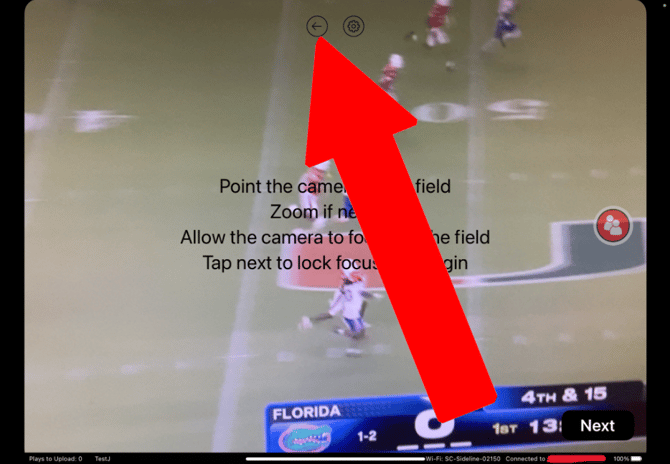
If you choose Local Camera, you will be met with this screen. Read the instructions, and click the Next button at the bottom-right to proceed to the recording screen.

%20(edited).png?width=310&height=215&name=17%20(Camera%20Open%20Not%20Recording)%20(edited).png)
If you want to start recording, press the red button on the right. Press the same button again to stop recording. You can use the buttons on the screen to tag information before or during the recording of your play.
To return back to your play list, press the back arrow at the top-middle of the screen.
Remote Control Only
If you choose Remote Control Only, you will be brought to this screen.
NOTE: The area where you can see your angles is not a live feed. It is a snapshot of what your RCK is showing that updates every few seconds.
To start recording, press the red circular button on the right. You can use the options provided to tag information before or during the recording of a play.
If you'd like more options for tagging, you can enable "Advanced Capture" using the 3 dots under the red recording button. You can also swipe left and right on the current tagging options on the screen to see additional fields.
After you stop your play, the Advanced Capture window will appear, and you can tag additional information for the play you just recorded.
To return to your play list, press the "Close" button in the top-left corner.

Step 3: Recording Settings
Here are some settings in the SkyCoach app that are related to recording plays:
- Auto Record - Turning this option on allows you to automatically record plays in specific time intervals.

Advanced Capture - This option turns on the Advanced Capture feature, which allows you to tag more information on plays after recording them in Remote Control Only mode.- Camera Angle - This is the name of the angle for recorded plays from this iPad when using the Use Local Camera option.
- Officials Mode - When Officials Mode is turned on, the iPad can see plays from all angles.
- "Camera Tagging" section - These are options for different data points that you can tag from the Use Local Camera screen. You can turn off any that you don't need while recording, but be aware that this only affects the Use Local Camera screen. These tagging options also help with filtering and live reports (expanded on in Stage 3 Step 2)
Step 4: Tagging and Additional Data
NOTE: While tagging plays with different statistics isn't necessary, we recommend tracking ODK, series, and quarters at minimum.

If you're interested in keeping track of more specific information for your plays, our lookups system allows you to add custom entries into fields like personnel, play names, etc. to help you organize and filter the exact types of plays you want to see. Anything that you tag, regardless of category, can also be used to filter plays. More details about lookups are covered in the article What are lookups?
Live tagging
An additional option alongside Advanced Capture is the new live tagging system, where iPads in the current event can enter live tagging mode, and users can select more specific information about play calls as it's being recorded. The live tagging screen is very similar to the Remote Control Only screen, but it does not include a way to start and stop recording plays, and the title of the page at the top is different.

Go back to Stage 1 (Beginning Setup)
You have completed Stage 2: Recording Options
Proceed to Stage 3 (Reviewing Plays)
Proceed to Stage 4 (Exporting Plays)
Related Articles:
