iPad Usage Stages
Stage 2: Recording Options
Click here to go to the Recording Options Page (4 steps).
Stage 3: Reviewing Plays
Click here to go to the Reviewing Plays Page (2 steps).
Stage 4: Exporting Plays
Click here to go to the Exporting Plays Page (3 steps).
Stage 1: Beginning Setup
Step 1: Install
Download the SkyCoach app from the App Store.
.png?width=670&height=466&name=1%20(App%20Download).png)
Step 2: Log in and iPad Settings
Open the SkyCoach app and login with your team account. If this is your first time logging in on this iPad, make sure that you are connected to the internet before logging in.
.png?width=670&height=466&name=2%20(SkyCoach%20Login).png)
TIP: When you are finished using the SkyCoach app, we suggest swiping the app closed instead of logging out. Using the "Logout" button will require you to re-type your email and password in again. However, swiping the app closed allows it to memorize and keep your credentials when you open the app again.
While using the app, you may have popups appear requesting permissions for either local network or location services. Make sure to allow any permissions that the app asks for in order to fully connect to the SkyCoach network. If you accidentally deny one of these popups, you can turn them on manually.
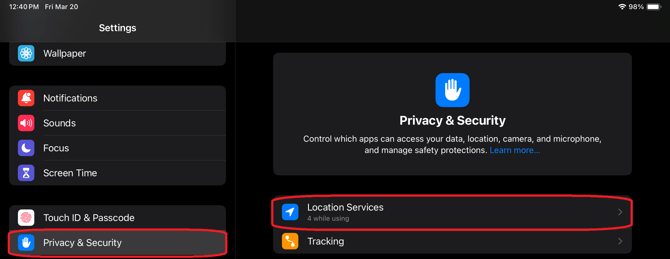
In your iPad's settings (the gear icon outside of the SkyCoach app), navigate to Privacy and Security (or sometimes called Privacy, depending on your model of iPad). Location services and Local network should both be under this menu. Enter both settings and make sure that SkyCoach is turned on.

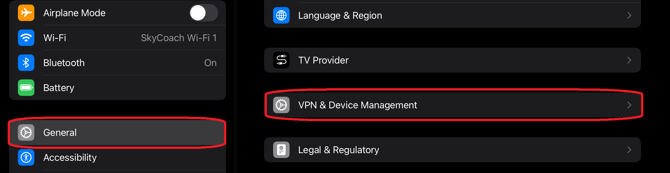
Another important setting to mention is any management settings your iPad may have. If your iPad is pre-configured and locked out of certain permissions, make sure to contact your organization's IT department and ensure that SkyCoach is approved and its related permissions are pre-granted. If you're unsure about whether your iPad is managed or not, you can check your iPad's settings under General >> VPN & Device Management.
Step 3: Change to Client Mode and Other App Settings
When opening the SkyCoach app, at the bottom of the screen, you will see the status bar. In the bottom-right corner, you will see the name of the Wi-Fi you are connected to, and the connection status of your iPad. The message "Connected to Cloud" means you are currently in Cloud Mode. We need to be in Client Mode to connect to events.
.png?width=670&height=151&name=3.1%20(Home%20Screen%20Cloud%20Mode).png)
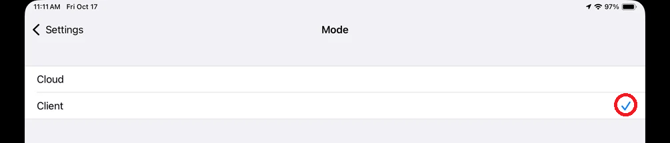
To change the Mode setting, go through the following menus: Menu >> Settings >> Mode. Once there, select Client and make sure that it has the blue check.
While in the Settings page, here are a few commonly used settings that can customize your SkyCoach experience:
- Network Performance - Allows you to see how well each part of your network is communicating. This is a good indicator for how aligned your stickered antennas are with each other. The article How do I use the Network Performance setting on my iPad? goes into more detail on how to understand/use this process.
- There is also a way to manually perform network tuning, which is explained in the article How can I tune network performance?
- Color Scheme - Changes the accent color of the app (see example pictures below of the Red and Purple Theme options)

- Officials Mode - When turned off, the iPad will only be able to view angles from devices that do NOT have the "Officials Mode" setting on. When turned on, the iPad can view all angles, including ones with the "Officials Mode" setting on.
- Days to Keep Media - How long the iPad will keep plays from an event. After the amount of time has passed, you will have to reconnect to your SkyCoach Wi-Fi to download the plays again. You can keep plays for 3, 7, or 14 days.
- Other settings that you will see in the SkyCoach app: Auto Record, Advanced Capture, Camera Angle, Officials Mode, "Camera Tagging" section
NOTE: While this does not explain all of the settings in the Settings page, others will be discussed in later stages of iPad usage.
Step 4: Connect to SkyCoach Network
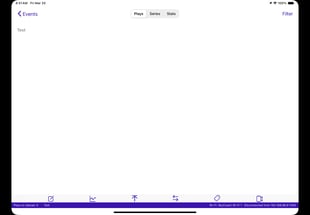
Going back to the Events page, at the bottom-right corner, you should now see that the message has changed to "Disconnected from" and a string of numbers (that is the host IP for your system).

Go to your iPad's Wi-Fi settings and look for your mesh's Wi-Fi network. The network name will look like this.
%20(cropped).png?width=670&height=59&name=11%20(WiFi%20Settings%20Screen%20Disconnected%20from%20Mesh)%20(cropped).png)
WARNING: Before you connect, make sure the 5 digits at the end of the network name matches your kit number. You will possibly see opposing teams networks during games.

After connecting, you should see a blue check. The "No Internet Connection" warning is normal, so you don't have to worry about it.
Once you're connected to the correct Wi-Fi, return to the SkyCoach app and navigate to the events page. You will now see in the bottom-right corner that you are connected to your SkyCoach Wi-Fi and your host IP.

NOTE: This is an example of a good status bar (sometimes referred to as a "ticker tape." Any time you are using an iPad with the SkyCoach system, make sure that this is the ticker tape message that you see.
NOTE: Before continuing, there are 3 iPad rules that you must follow to make sure that your iPads run smoothly and quickly throughout the game:
- Only join 1 SkyCoach Wi-Fi at a time. You should only join the SkyCoach network that you're closest to (e.g., join the SC-Sideline network if you're on the sideline, not SC-CoachBox).
If you need to move closer to another network, in your iPad's Wi-Fi settings, select the blue "i" next to your current SkyCoach network and select "Forget this network." That way, your iPad won't attempt to swap between SkyCoach networks once you connect to your other Wi-Fi. - Join the event before kickoff. Make sure that all iPads that are being used with SkyCoach are joined in the event in the SkyCoach app before the game begins.
- Keep the iPad screen active. Do NOT lock or close the iPad during the game. The iPad does not update with plays that are captured while it is closed, and it will have to catch up with any missed plays once it's reopened, which will slow down the network.
You have completed Stage 1: Beginning Setup
Proceed to Stage 2 (Recording Options)
Proceed to Stage 3 (Reviewing Plays)
Proceed to Stage 4 (Exporting Plays)
Related Articles:
- What do I do if my iPad says disconnected?
- Why does my iPad say no image available?
- How do I use the Network Performance setting on my iPad?