
iPad Usage Stages
Stage 1: Beginning Setup
Click here to go to the Beginning Setup Page (4 steps).
Stage 2: Recording Options
Click here to go to the Recording Options Page (4 steps).
Stage 3: Reviewing Plays
Click here to go to the Reviewing Plays Page (2 steps).
Stage 4: Exporting Plays
Step 1: Export Plays from SkyCoach
Find and enter the event whose plays you want to export. If each of the plays loads a picture, and you are able to watch the plays, then that means the plays have been downloaded onto your iPad and are ready to be exported.
If the plays do NOT load (either the plays say "No Image Available" or the plays themselves do not play when selected), then you can connect your iPad to your SkyCoach network to download them again. If you continue to have issues with your plays not appearing, please contact our support line at (318)-629-5701.
At the bottom of the screen, select the up arrow icon. In the popup, there are two choices: SkyCoach Cloud, and Files for Hudl/Others.

NOTE: In order to have the option to export a game to SkyCoach Cloud, you must create the event while in Client mode, then change to Cloud mode when attempting to export.
Files for Hudl/Others
After choosing this option, a popup will appear with a summary of plays that were exported for each camera angle. Make sure that this number matches the actual number of plays that you recorded to ensure that there wasn't an issue with exporting them. The popup gives more information about what to do if this occurs, but if you still have trouble exporting the correct number of plays, please contact our support at (318)-629-5701.

Step 2: Locate Exported Files
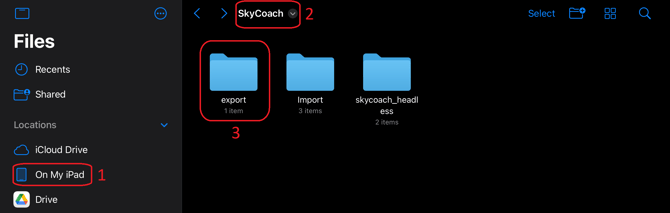
Once exported using the Files for Hudl/Others method, you can find the plays in the Files app of your iPad, then navigating to On My iPad >> SkyCoach >> export. There will be a folder for each angle that was recorded, as well as a CSV file for each angle that contains the data/tags that were marked for each play. Enter the folder for the first angle that you want to upload.
NOTE: Whenever you export plays using the Files for Hudl/Others option, the previous contents of the "export" folder will be overwritten. Once you have exported plays from an event, make sure to upload or make a copy of the files in a different location to ensure that you still have access to them without having to export them again once they're overwritten.
Step 3: Uploading/Moving Exported Files
NOTE:
-
To upload the clips to Hudl via iPad, the iPad must have iOS 13.1 or higher in order to have apps open side-by-side.
-
You will also be using the browser form of Hudl (i.e., visiting the Hudl website through a browser app like Chrome or Safari), NOT the Hudl app.
-
If you have the Hudl app on your iPad, you will have to remove it. Otherwise, the app will attempt to open whenever attempting to go to the home page in a browser.
-
This video explains the process of exporting to Hudl via the iPad, but a written explanation has also been provided below:
First, if your version/model of iPad has it, you can select the three gray dots at the top of the screen, then select "split view," and select your browser app to set up the split view.
You can also swipe up from the bottom of your screen, hold down on your browser app, and drag it to the left side of the screen. Your iPad should now have both the browser and the files app open at the same time.
You can use the gray bar between the two views to change the size of the split. You can also move in and out of the split view to make it easier to navigate the Hudl website.

Second, on the browser side, navigate to where Hudl lets you upload files. On the files side, choose "Select," then "Select All," then hold down on one of the plays until it shows a little blue icon with the number of plays selected. Once the icon appears, drag and drop it onto the Hudl side, which should begin the upload process.
NOTE: You are not allowed to drag and drop a folder, which is why we have to go through the process of selecting all the files to drag and drop over.
Then, after the first angle's videos are uploaded, there will be an option on Hudl to add another angle. Select that button, then in the Files app, navigate to the next angle that you want to add, and follow the same process until all of the angles you want to add have been uploaded.
These last two sections are completed in the Hudl website.
 Once all of your video files have been uploaded, follow Hudl's intercut process. Once the videos have been merged, you can add the data you tagged to the plays by selecting the three dots in the bottom-right of the player screen, selecting "Import Data," selecting the "Choose File" button, then "Browse," then navigating back to the folder with your exported videos (On My iPad >> SkyCoach >> export), and selecting any one of the angle data sheets (they all have the same data on them, so it doesn't matter which angle you choose).
Once you choose a file, select the "Import Breakdown Data" button, and two columns will appear, which is comparing the normal values that Hudl has against the data in the sheet. Most of the values should match since SkyCoach uses the same names. For any columns that don't match, you can either map them to a different Hudl column, or you can select "Don't Import This Info." Once this is complete, select "Import Data Into Hudl."
