
iPad Usage Stages
Stage 1: Beginning Setup
Click here to go to the Beginning Setup Page (4 steps).
Stage 2: Recording Options
Click here to go to the Recording Options Page (4 steps).
Stage 4: Exporting Plays
Click here to go to the Exporting Plays Page (3 steps).
Stage 3: Reviewing Plays
Step 1: Viewing Plays and Playback Functions
After recording plays using one of the methods mentioned in previous stages (either in Stage 2 Step 2, or from How do I use a Remote Camera Kit (RCK)?), your play list screen should show your recordings ready for replay.
NOTE: You must remain in the active event for plays to automatically download to your viewing iPad. This can either be at the play list screen or the playback viewer.

Click on any of your plays to see the recording of it.

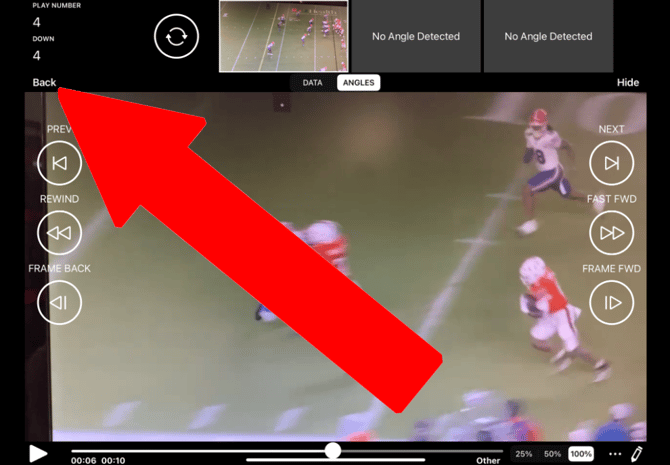
In the playback viewer, there are several different controls for viewing the play itself:


-
There are two different views in the playback viewer: Data view and Angles view.
-
The Data view allows you to see all of the information that was tagged on this play, as well as modify and save the data if needed. You can go through every angle of the play by swiping left or right. To edit data, tap the black area at the top to make the fields editable, change any of the information you need to, then tap the "Save" button at the right side of the black area.
-
The Angles view lets you switch between angles by tapping the angle that you want to see at the top. Swiping left and/or right will change the play, since the desired angle is already selected.
-
For both views, when switching angles, the playback resumes at the same moment in time (e.g., if you change from the Wide angle to the Tight angle at 5 seconds, the play will continue from the 5-second mark on the Tight angle).
-
-
You can rewind and fast-forward through the play by pressing and/or holding the labelled buttons on the sides.
-
You can also go forward and backward frame-by-frame using the side buttons
-
The "Next" and "Prev" buttons changes the playback viewer to the next or previous play, respectively. This is the same as swiping left and/or right in Angles view.
-
You can skip through the play by dragging the circle on the scrub bar at the bottom of the screen.
- You can pinch the iPad screen to zoom in or out of the playback recording.
-
There are options for playback to be at 100% (normal) speed, 50% speed, and 25% speed by selecting the percentages in the bottom-right.
-
The pencil icon can be used to draw over the play, though the markings will not be saved once you exit drawing mode.
-
The three dots at the bottom contain a menu that has two options: Loop Preference and Show Scoreboard.
- When Show Scoreboard is enabled, if you recorded snapshots of your scoreboard, they will show with the associated play in the bottom-left corner.
- Loop Preference gives three different options of how plays should be looped through:
- Loop this Play - This option will play the current clip on a loop until you manually change it to another play.
- Loop until New Play - This option will loop the current play until a new play is downloaded. It will then switch to the new play and continue looping until the next play, etc.
- Go to Next Play - This option will play the current clip once, then continue through each play afterwards until it reaches the last play.
You can return to the play list using the Back button.
Step 2: Filtering and Statistics

When looking at the play list, you can filter the plays by several different criteria at once. Any data that you tag your plays with can be filtered for using the filter menu.
Favorites
Favorites are a way for coaches and teams to create customized playlists for themselves by tagging different plays with different icons. You can make each icon mean a different person or play type (e.g., heart icon is for one coach, star icon is for another, etc.), and when you filter by each icon, these personalized lists of plays will allow you to quickly review these favorites at a glance during and after the game.
If you're using a shared system (i.e., a SkyCoach system that has both Home and Visitor Sideline stations), you can also set a password to prevent the other team from seeing plays marked as favorites. More details are covered in the article What is Password Protected Favorites in Shared Events?
Series Page
If you select the "Series" at the top of the screen, you'll be brought to the Series page, which provides a general overview of the plays within each series (as long as they have been tagged with a series number). Each category of the plays can be clicked on to view the plays that have been tagged with that category. For example, you can select the Runs under Defense in Series 1 to see all of the plays that were tagged as runs on Defense in Series 1. This page is explained in more detail in another article.
.png?width=670&height=466&name=seriesPage%20(1).png)
Stats Page
While looking in the play list, you can change to the Stats page by selecting "Stats" at the top of the screen. From this screen, you can see the statistics about different plays, as well as filter them based on what kind of information you want to see. Filters can be saved into a preset that can be named, though these filters are saved per-iPad. You can also view the plays that are tagged with the data that you're searching for. This is further discusses in another article.
.png?width=310&height=216&name=statsPage%20(1).png)

Go back to Stage 1 (Beginning Setup)
Go back to Stage 2 (Recording Options)
You have completed Stage 3: Reviewing Plays
Proceed to Stage 4 (Exporting Plays)
Related Articles:
