PAGE SHORTCUTS:
- Host Box, Station Box
- 3 Setup Parts
- Diagram 1 (without bridge) & Diagram 2 (with bridge)
- Power Supply
- Training Link
- QR & Overview
PARTS:
- 3 stations: PressBox, CoachBox, Sideline, EndZone
- Pi Host and Green Gigabit Router
- 6 AC Bridge Antennas: RB, RW, BW
- 1 Mesh CoachBox AP
- 3 Remote Camera Kits
- 2 powertube
- 1 powertube ULTRA
HELPFUL LINKS: [CHECK setup instructions]
- Setup Instructions
- Diagram 1 (without bridge) & Diagram 2 (with bridge)
- Pregame Checklist
- How to Tune Your Network
- Keys to Success
Please schedule a training session with our specialist using THIS LINK. Have your SkyCoach equipment, cameras, and iPads available in an office/classroom setting. Invite your setup staff/helpers. Our trainer will walk you through setting up the equipment and running a game. Performance and pro tips will also be shared at this time.
Please make note of the following:
- Your Kit# is found on the outside of your toolbox
- The username and password for your app is found in your SkyCoach Training email
- The wifi access codes for your kit are found in your SkyCoach Training email
- This is your model#: 6AC(RB,RW,BW)1M1U7PHGR-4P3RP-2WT1PBU-CR
- Your kit style is a Diamond Plus Coach Replay
3 Parts To Set Up Your Kit
A. Set Up your Network
Click here to go to the network section.
B. Set Up Your Remote Camera Kit (RCK)
Click here to go to the RCK Setup Page. (4 steps)
C. Set Up Your iPad
Click here to go to the iPad Setup Page. (4 stages)
Platinum Plus Coach Replay
4AC(RB,RW)1M1U7PHGR-3P3RP-1WT1PBU-CR (without bridge)
1M1U7PHGR-3P3RP-1WT1PBU-CR.png?width=670&height=405&name=4AC(RB%2cRW)1M1U7PHGR-3P3RP-1WT1PBU-CR.png)
* The above configuration is used for games when the filmers and press box coaches are on the SAME side of the field.
Diamond Plus Coach Replay
6AC(RB,RW,BW)1M1U7PHGR-4P3RP-2WT1PBU-CR (with bridge)
1M1U7PHGR-4P3RP-2WT1PBU-CR.png?width=670&height=379&name=6AC(RB%2cRW%2cBW)1M1U7PHGR-4P3RP-2WT1PBU-CR.png)
* The above configuration is used for games when the filmers and press box coaches are on OPPOSITE sides of the field.
HOST BOX (brains)
PRESS BOX STATION: 1 host box, 2 RCK, 2 bridge antennas, 1 mesh access point
You will need 3 power outlets: one to power the host box and one to power each RCK. The 2 round antennas will mount to one of your stands and point at the field as indicated by their labels. The host box and RCKs will stay with the filmer.
Use a long ethernet cable to run from the POE24 port on your injector to the mesh CoachBox access point (the skinny "bunny ear" antenna). Attach the foldable rods to the top of the mesh antenna.
* The skinny "rabbit ear" mesh antenna provides the SC-CoachBox-WiFi access for the coachbox iPads and will ensure fastest download speeds when placed in the room with the coaches.
[NEEDS NEW PHOTO WITH RB AND BW ANT, ALSO 1 MORE RCK]
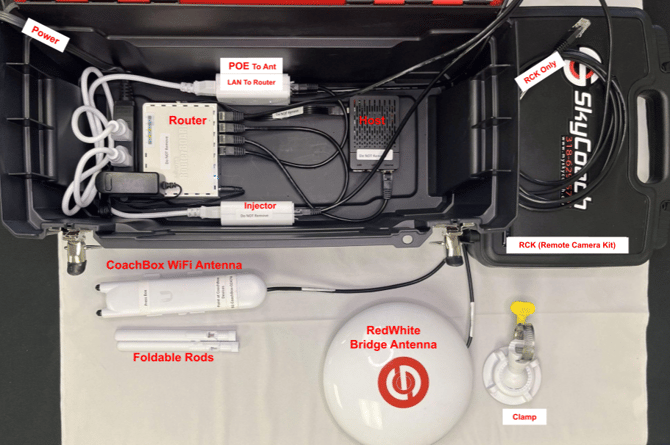
- 1 green gigabit router
- 1 Pi host server
- 2 ethernet cables for your RCKs
- 2 ethernet cables connected to LAN port on each injector
- 1 AC red/white stickered antenna to bridge to the EndZone, connected from the POE24 port of injector to the Main port of antenna
- 1 Mesh CoachBox-WiFi antenna to connect to devices in the press box
(this bunny will move to the coachbox station when coaches are across the field) - This is connected to the POE24 port of injector when coaches are on the same side of the field as the filmers
- SC-CoachBox-XXXXX
- 1 Mesh CoachBox-WiFi antenna to connect to devices in the press box
- 1 AC black/white stickered antenna to bridge to the CoachBox
(only use this antenna when coaches are across the field from the filmers)- This is connected from the POE24 port of injector to the Main port of antenna, when coaches are across the field from the filmers
- See this picture to replace the bunny with the black/white round antenna
STATION BOX (field equipment)
SIDELINE STATIONS: 1 bridge antenna, 1 powerbox ULTRA, 1 U7 sideline AP
[NEEDS NEW PHOTOS AND WORDS WITH A PBU AND A U7]
You will need 1 power outlet for each sideline power supply. Mount the 2 antennas to one of the stands and place it at the 35 yard line. The stand should be extended high so the antennas are not obstructed by the players.
 The round bridge antenna will point at the matching press box antenna as indicated by the label. Be sure the antenna has a clear and straight line of sight with no obstructions. Be sure to adjust the angle on the round antenna to point up at the matching antenna.
The rectangular U7 antenna is directional and should be pointed down the sideline/player's box towards the ios devices. This provides the SCH- and SCV-Sideline-WiFi access for the sideline iPads and will ensure fast download speeds.
Any iPad can connect to the SkyCoach network via the provided access point ("WiFi") or connect directly to the network via an ethernet adapter and powerbox port.
WARNING: Connecting the POE 48v to anything other than the U7 WiFi antenna will permanently damage the device!!!
Please proceed with extreme caution in the event you ever change the ethernet. We have labeled our ethernets to aid in care of the equipment.
The POE 24v will connect to the main port on the round antenna, also labeled.
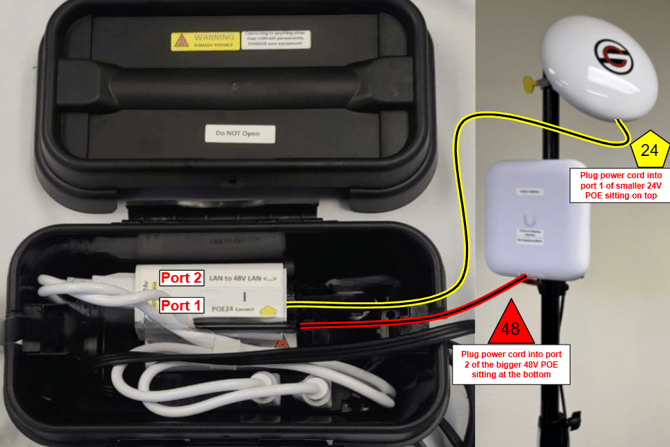
- 1 AC red/black stickered antenna for home sideline to bridge to the pressbox
- 1 U7 Sideline-WiFi antennas & powerbox ultra to connect to devices on the sideline
- SCH-Sideline-XXXXX with powerbox ultra for the home sideline iPads
END ZONE STATION: 1 bridge antenna, 1 RCK, 1 powertube
You will need 2 power outlets: one for the powertube and one to power the RCK. The round antenna will point at the matching press box antenna as indicated by the label.
You can mount the red/white round bridge antenna to the leg of your end zone tripod or camera stand. Be creative or even switch the ethernet cable for a longer one to get the best position for your antenna.
* Be sure the antenna has a clear and straight line of sight with absolutely no obstructions and especially avoiding the field goal post.
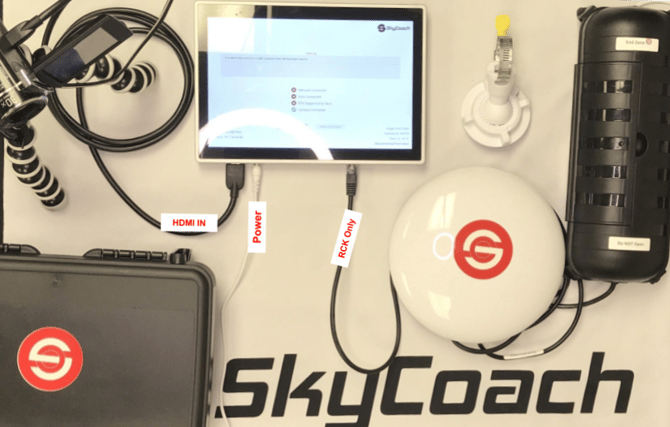
- 1 powertube
- 1 AC red/white stickered antenna in the end zone to bridge to the pressbox, connected from the POE24 port of the powertube injector to the Main port of the antenna
- 1 ethernet cable for your RCK, connected to LAN2 port of the red/white round antenna
- 1 AC red/white stickered antenna in the end zone to bridge to the pressbox, connected from the POE24 port of the powertube injector to the Main port of the antenna
COACHBOX STATION: 1 bridge antenna, 1 mesh access point, 1 powertube
You will only use the coahbox station when the filmers and pressbox coaches are on opposite sides of the field. The filmer will keep the host box and RCK while the coaches will use the coachbox station. This scenario will use the coachbox bridge.
- IN THE HOST BOX: Remove the ethernet from the SC-CoachBox-WiFi "bunny ear" antenna and connect it to the black/white round bridge antenna labeled "PressBox, Point at CoachBox". See this picture
- IN THE COACHBOX STATION: Attach the SC-CoachBox-WiFi bunny to the secondary LAN2 port on the black/white station antenna labeled "CoachBox, Point at PressBox". See the picture below
* The "skinny rabbit ear" mesh antenna should be in the room with the coaches. This provides the SC-CoachBox-WiFi access for the coachbox iPads and will ensure fast download speeds.
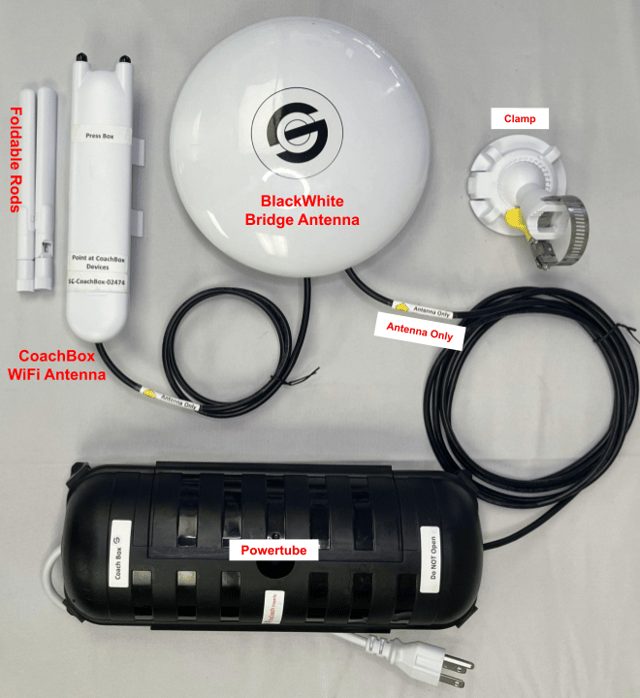
- 1 powertube
- 1 AC black/white stickered antenna in the coach box to bridge to the pressbox
- 1 Mesh CoachBox-WiFi antenna to connect to devices in the press box
- This is connected to the LAN2 port of the black/white round antenna
- SC-CoachBox-XXXXX
- This WiFi bunny will move to the press box station when coaches are on the same side of field as the filmers - see this picture
- 1 AC black/white stickered antenna in the coach box to bridge to the pressbox
2 POWER SUPPLY for this model:
Powerbox ULTRA
%20cropped-1.jpg?width=670&height=674&name=Powerbox%20ULTRA%20(inside)%20cropped-1.jpg)
-
1 white 24V POE injector
- The red POE24 port on the injector uses a 10' ethernet cable to connect to the main port on the round antenna
- 1 white 48V POE injector
- The red POE48 port on the injector uses an ethernet cable *labeled with a 48v warning sticker to connect to the IP camera
- The LAN ports on the injectors connect to each other with a 6" ethernet
- The cables crossover to exit
WARNING: Connecting the POE 48v to anything other than the IP Camera will fry whatever you connect it to!!!
Powertube
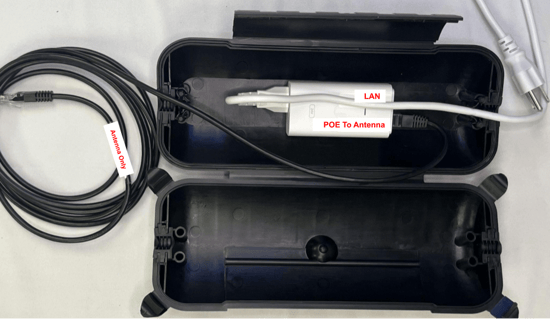
- 1 white POE injector
- The red POE24 port on the injector uses a 10' ethernet cable to connect to the Main port on the round antenna
- The LAN port on the injector can be left empty OR connect a device (like RCK or iPad) to the network
- The cables crossover to exit
You have completed Part A (Setting Up Network)
Proceed to Part B (Setup RCK)
Proceed to Part C (Setup iPad)